
Watercolors can be simplified into 3 basic edges soft, medium and sharp. And the tricky edge… is of course the in between one. Come on and I’ll explain a few fast beginner pointers that will help!
Watercolor – Soft edges, Medium edges, Hard edges
Why should we care about watercolor edges? What is the relevance? These 3 edges are key factors in creating depth and smooth transitions in our backgrounds, middlegrounds, and our foregrounds. These are simple, foundation watercolor basics.
Watercolor Edges and the Beginner-
Watercolor is filled with peaks and valleys. Quantum leaps ahead and stale plateaus. For all of us.
But for the beginner, it seems like a never ending slog uphill at times! Controlling the water on the brush and the paper is perhaps the biggest dilemma. The edges just seem out of control.
But, by Practicing these 3 edges – in series, and serious repetition – I assure you will help you to achieve the quantum leaps you’re hoping for.
Soft Edges
Smoke and Fire image was begun wet in wet background, with only a tiny bit being harder edged. Painted on Yupo paper.
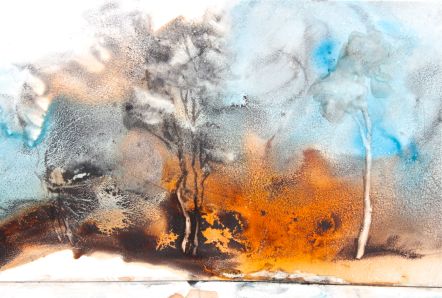
Why
Soft blurred, out of focus edges create the illusion of the objects receding into the distance, thus you create more depth and perspective with this technique.
This watercolor edge is often underused. Perhaps because of the sequencing and timing issues. If you try to paint more very sloppy wet paint into this as its going dry, you discover – disaster and mud. Thus, many abandon the wet in wet technique too early.
How
You will always create a soft, blurred edge when you apply paint to a very wet paper surface. Many times I use the wet in wet technique for this purpose, especially for skies.
Wet the paper, all over. Double check it in the light. Touch the wet receptive paper with the fully loaded brush tip and allow that paint to flood in, onto the paper by itself, without manhandling it.
Where
Generally, in the backgrounds. On occasion, elsewhere as called for by the subject being painting.
Hard Edges
Blue Bottles were an exercise in watercolor hard edges, painted on a totally dry paper.
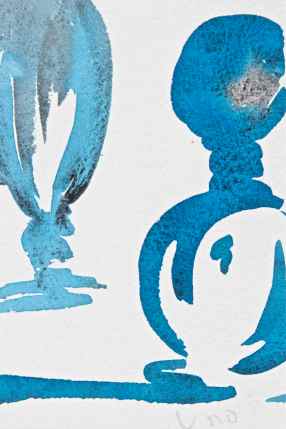
Why
The nearer the object is to you, the more in focus and sharper the edges will appear. Creating hard, sharp edges creates the illusion of nearness and depth.
How
Hard, sharp, crisp lined edges will always be created when you paint upon a perfectly dry paper. If it is dry paper, the edges will be sharp and hard.
Where
So ideally, we wish to have progressively sharper edges as they advance to the foreground. Meaning, you need to have the background softer in order to have that latitude to work with.
Generally, an object at the base, say the bottom of a bucket or rock, will appear to be softer edged. The top of that object will appear to be sharper and harder edged.
It is a good ‘habit’ to get into as a beginner, to follow these guides, in the beginning.
Creating the soft and hard edges are actually very easy to do. Beginners normally compensate by painting with hard edges only, due to the control they have with those edges; but often resulting in the loss of adequate depth and perspective.
Because, we generally need all 3 edges to make the image have better depth and perspective. Creating all 3 edges gives the image a fighting chance for success. Its much more of a hit and miss if you only use 1 edge.
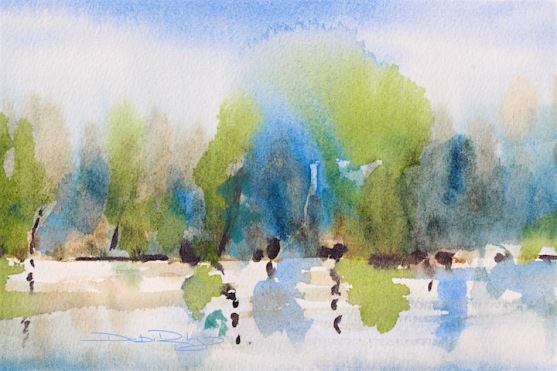
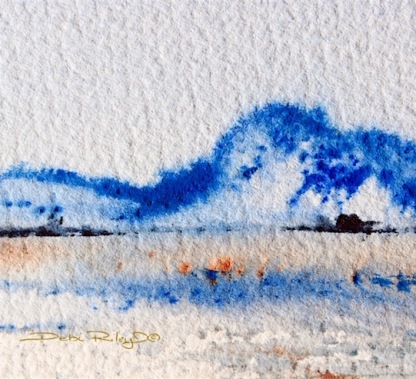
Medium Edges
Both Hillside images were created using the watercolor medium edge technique. Waiting…til the paper was just right. Then, the brush load was also – just right. Another Goldilocks, yes?

Why
This watercolor medium edge isn’t sharp and hard, but neither is it soft, out of focus.
It’s In Between!
Its a transition edge, that allows the eye to smoothly, wander from the background to the foreground and vice versa.
Without jarring or rough discordant ‘bouncing’ along.
Where
The Medium edge creates the Bridge between the distances and the planes of space within your painting.
This edge is a perfect edge for many middleground objects and shapes.
The ‘in between’ edge, is really the trickiest edge to master, taking the longest time and effort to get the hang of.
But, practicing on scrap paper, a simple brushstroke on ‘just damp’ paper in repetition for a few days will quickly show you how to get it right.
Repetition of the process, is the key to its mastery. Cold Press paper is my suggestion for this as well.
How
The watercolor paper is at the ‘just damp’ stage.
Not dry, not sloppy wet. Damp, as if you had just dampened or prewet a blouse to iron…. close enough analogy.
It must be damp all over, with no dry spots. Definitely no puddles or pools of water.
If the paper or the paint, has a slight satin sheen to it…. that right there… is just about Perfect!!
Your brush. Can not have a lot of wet, sloppy, dripping paint on it!! It will need paint, but the paint needs to be on the slightly, drier side. With NO drips coming off the brush.
Proceed to take the brush and stroke it across the damp paper to see what type of edge was created. Was the paper too wet? Too dry? Was the brush too wet? Too dry?
Change those factors and repeat, until you become more at ease with the medium edge.
None of these watercolor landscapes images were large; all were 5×7 or smaller. Nice little practice sizes that were easy to deal with, very quick to do in a series and in repetitions.
My mind in each was set not on perfection, but on “Just do it and move on to the next. You are practicing. Not trying for a framed image. It is an exercise today. Now, move along!”
Perhaps, by reiterating the fact several times, that it is indeed Just An Exercise…. you also might loosen up and be a tad bit freer.
More relaxed and enjoy the process more.


I love these and you make sound so easy.
LikeLiked by 3 people
except for the ‘tricky’ edge.. lol; thank you Nico, I was wanting to do a long post this time. A good reference source for beginners down the track.
LikeLiked by 2 people
Excellent.
LikeLiked by 1 person
I love all the edges ~ and especially that last image. My work is usually so messy that the edges often get blurred but I do like those hard edges at times.
LikeLiked by 1 person
I’m in the ‘soft edges’ camp; love them! much preferred over all Hard pointy edges that poke you. 😉
LikeLiked by 1 person
Thank you Debi, your explanation is so helpful. I do appreciate the time you put into your lessons. Wonderful examples.
LikeLiked by 1 person
thanks Sharon; yes, this was quite abit longer! I’m glad that it came across clearly and the images seemed to suit as well. Thanks!!
LikeLiked by 1 person
I’ve driven past all of these places in Montana, except for one. The blue bottles were a surprise. Before I read the title I thought they resembled two penguins. The one on the right, walking, and the one on the left diving into the water (so he’s upside down). Lovely paintings, all of them, and great lessons in how to dabble with the materials.
LikeLiked by 1 person
I love the penguin idea! I should have gone with that… but no, plain old bottles. 🙂 Thank you so much, for another lovely thoughtful comment; much appreciated! Debi
LikeLiked by 1 person
That’s the beauty in your kind of art. People take from it whatever it inspires in them.
LikeLiked by 1 person
Thank you! Thats one of the nicest things someone could say!
LikeLiked by 1 person
That was great, thank you.
LikeLiked by 1 person
hi Deb, very pleased that you enjoyed this post and information today! cheers, Debi
LikeLiked by 1 person
I never really thought about edges and apparently I work with hard edges mostly but now I’m very curious about how the rest works and looks! Very informative posts again!
LikeLiked by 1 person
Thank you Sofie! We are all different 🙂 Every artist has their innate preferred edge – depending a bit on their personality I think too.
Hard edges allow for a lot more
Control, thats for sure.
LikeLike
Hi😊debi this is so different and wonderfull pictures! So perfect
LikeLiked by 1 person
thank you, so glad you enjoyed the post and information on watercolor! cheers, Debi
LikeLiked by 1 person
Good teacher! Great breakdown
LikeLiked by 1 person
Thank you Kate, for such a lovely thoughtful comment! Cheers, Debi
LikeLike
Very informative post! So impressed with your lessons Debi! And very appreciative! Thanks! 😃
LikeLiked by 1 person
helloo Charlie! thank you most kindly! I’m so glad you enjoyed and found it useful.
sometimes, we wonder if a post is a hit, or a dud. lol So, thank you for your very lovely comment! cheers, Debi
LikeLiked by 1 person
You really should write a book, Debi. Between your paintings and your lessons, you could really make a go of it, I think. It would educate and inspire the heck out of everyone reading! 💜💜💜
LikeLiked by 1 person
Thanks so much for that Laura!! 🙂
Well, my ebook is at page 29 without images at this point!
Jodi’s hinting for me to learn to do ‘videos’ …..
then I still need to get a SHOP found, organized and set up. 🙂
LikeLiked by 2 people
Go go go! :))))
LikeLiked by 1 person
Great post with great examples of each. I especially like the “why” of each technique. Sometimes we do things (or don’t) without thinking about it and it’s good to analyze it.
LikeLiked by 1 person
hi Eileen, Thank you for a great comment!
I’m the one in the class or meeting… always wanting to know – Why? And the facts, Details!
(you can’t just take someone else’s opinion as gospel all the time, can you! LOL )
LikeLike
Awesome, thank you!
LikeLiked by 1 person
Thank YOU! For this wonderful comment Eileen 🙂 cheers, Debi
LikeLike
One day I must copy all your good tips in order to learn more about aquarell painting. Love your examples, they are wonderful, Debi, cheers from the cold, Mitza
LikeLiked by 1 person
do you have watercolor paints? for some reason, I didn’t think you did….
LikeLiked by 1 person
I’m not sure, I have to look, but maybe. I was just about to buy something in ebay. Water colors are very expensive I have seen.
LikeLike
are they? If you did get some, maybe then just 1 Good one, like a burnt umber or phalo blue to start off with. that way you don’t waste money on the cheap rubbishy ones!! if you got 2, the umber & phalo are a great pair to start too. they are the least $$ of the colors, and quite Versatile in their use.
LikeLiked by 1 person
mostly you have to take the container as it is and cannot choose the colors. do you know the German company “Schmincke” which makes high quality aquarell colors?
LikeLiked by 1 person
Yes, Schmincke is quite good! but, thats a pity they don’t sell in individual tubes over there!! I’m shocked! Do you have Old Holland, Holbein, Winsor and Newton watercolor paints there? Very bad of the art stores, to not sell individual tubes.
LikeLiked by 1 person
Maybe I didn’t explain it in a right way: you can buy individual tubes, but the things I saw in ebay were 12 colors which you couldn’t choose. So now I found somebody who sells individual tubes and tomorrow maybe I’m lucky to get these for little money. I think we also have Old Holland, Holbein (was a German painter) Winsor and Newton, but I found the best estimation for Schmincke. 🙂
LikeLiked by 1 person
now… I see !!
LikeLiked by 1 person
Dear deb ☺Your lessons to powerfull !
LikeLiked by 1 person
fantastic to hear! thank you!! Glad that you enjoy and find them informative too 🙂 thank you for letting me know! cheers, Debi
LikeLiked by 1 person
I do not paint watercolors, but LOVE yours! They are incredibly beautiful and I thoroughly enjoy all your lessons on techniques. You offer, share such a broad variety of tips and some can be applied to a certain extend for other applications. Undoubtedly you’re one of my favorite artist/teacher/blogger friends if I may say so! 🙂
LikeLiked by 1 person
Thank you Eva!! what an awesome compliment! I do aim for a lot of the info to be Versatile and cross over – even the wc posts. many thanks 🙂 Debi
LikeLiked by 1 person
These are beautiful. I wish I could paint in watercolours – I went out with an art teacher many moons ago and we used to got out and paint, but I just couldn’t get it somehow…
LikeLiked by 1 person
Thank you, for a lovely comment!
I wish you could try again!
worry/stress, trying to get it exactly – just right, not having enough beginner basics to start, and not having the simple (few) tools needed can contribute to w/c difficulties!
THATs my story, and I’m sticking to it. 🙂 Cheers, Debi
LikeLiked by 1 person
Edges are fascinating element to art, I’ve learned to really appreciate them. The Masters, were just that in managing their edges.
LikeLiked by 1 person
you’re so right about The Masters, Mary! they were brilliant at where to put each type of edge….. amazing.
Thanks for that Mary!
LikeLiked by 1 person
Great Debi. Love the Yupo paper image. Introduced to it last year and find it produces the most unexpected and exciting responses to the paint as you show so beautifully.
LikeLiked by 1 person
thanks Andrew, Yupo a very quirky surface. But can be…So Wonderful. thanks again 🙂
LikeLiked by 1 person
small? simple? yet I would fame every one of these swoonable beauties!!!!! :0
LikeLiked by 1 person
Thank you Jodi, your own Creativeness is also swoonworthy. you know your digital skills are fab!
. once my mind is made up to limit the lines, shapes, details, …it does make it easier. but, sometimes I must be quite STERN with myself! smiling 🙂
LikeLiked by 1 person
oh – thanks – but really not – I have so much to learn. Isn’t that interesting that you must be STERN with yourself to limit to create such abstract free looking art. See – there you go teaching me. Refrain – limit – that is my lesson for today. 🙂
LikeLiked by 1 person
what! How can that be? Do my eyes deceive me!? surely, you jest 🙂
LikeLike