What’s a gelli-print!? It’s a super soft, print making ‘plate’ that has quite a bit of flexibility. Yes, you can buy premade “Gelli Plates.” I chose not, today. I wanted to make a DIY! To create it from things in my kitchen.

“Wow, what fun! Creative, imaginative. Liberating.” And, “I feel like a kid Again!” These were some of the thoughts that sped through my mind as I was busy mixing and printing my very colourful gelli prints.
DIY Gelli Print Plate: Glycerine and Gelatine

DIY Gelli Plate Recipe and Process
To make the homemade gelatine gelli plate: I used 4 TB gelatine, 1 bottle glycerine, 2 cups boiling water.
I slowly added the boiling water to the gelatine. Stirred well. (I could have stirred it a bit slower to avoid bumps and bubbles.) Lastly, I slowly stirred in the glycerine.Using this recipe, I don’t have to put the gelatine plate in the refrigerator to keep.
Then I poured the hot mix into a round glass pie plate to set. Most of the gelliplates are squares or rectangles. You can make one of each if it suits your fancy.
The glycerine and gelatine together only cost about $12, so I saved quite bit by making the plate myself rather than buying one premade. If I tear it, or damage it, all I have to do is reheat it in the microwave then repair into a container.
I used glass. Mainly because thats what I have handy and its easy to put in the microwave.
Cleaning and Storage
Questions about the homemade gelli print plate, i.e. gelatine plate, have been asked on how to clean it. Its pretty easy, when you are done for the day just give it a quick rinse or wipe gently. Its not necessary to keep the plate clean each time you do a new gelli print during the day though, as the colours and textures that emerge act as wonderful new dimensions to the image.
There are lots of recipes for gelatin plates. By searching online you can find one you might like better, or works better for you. You can try Jan at inatickle.com she has a good post dated January 23, 2014 that I thought was quite interesting as well.
Below, you can see the round gelatine print plate. It slid right out of the pie pan. I merely took a spatula to the edges all around, flipped it upside down and voila! It popped out. Easy.

Materials for gelatine plate printmaking
I used acrylic paints, tons of printmaking papers, a brayer and some Qtips. Papers that work best seem to be thinner and lighter i.e. rice paper, Masa, printmaking types. Newspaper, deli paper, computer paper work but…. its a shame when you get a real Beauty on it rather than a paper that will last more than a few months.
You could use stencils, bubble wrap, leaves, string, etc. to create textures and patterns. Always use soft rubbery tools, not sharp tools that will scratch the plate.
- I dobbed paints straight onto the gelatine plate, then used a brayer to spread it around til I was happy with the look.
- At that point, I used a Qtip to wipe off some colour for highlights.
- Then, laid a paper down on top of the plate and pressed, rubbed the paints into the paper.
- Next, I peel the paper off to see what my imagination has created.
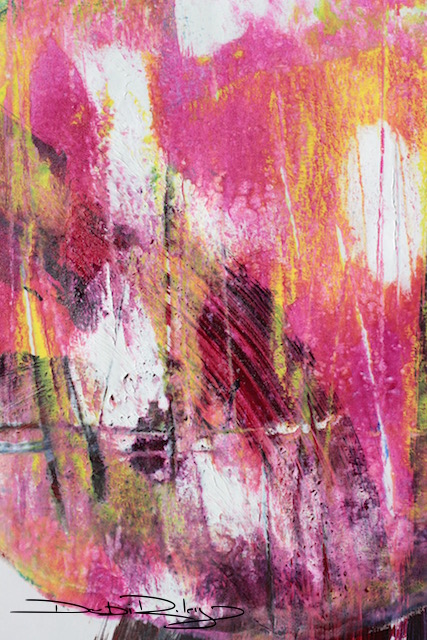
Inspired by Pink and Yellow Everlastings from King’s Park


Love the colours and movement in this one!

In the past, I’ve used glass, lino, plexiglass, copper plate, plywood, cardboard for printing plates. I’ve not used ‘craft’ items. So it was with a bit of apprehension and doubt that I explored the gelatine plate printing process. No, I don’t think I’m an art snob….. well, maybe just a…. tiny bit.
The turquoise and blue turned out bold and strong, I found myself really getting into the whole gelatine plate process. I was enjoying the experiment!

Below: This round orb, is the complete print from the plate…. the very first photo is just a snippet from this one.

Lovely monochromatic palette, with streaky thin lines like branches or strings; interesting textures and oval forms. This one has a certain something, that is very John Olsen like to me. It is certainly Australian in its colours and mark making style.

Art for Fun.
Imaginative, experimental, creative, colourful. I was pleasantly surprised by this DIY gelli plate printing project.
Fast paced, process based yet – rewarding with its plethora of products, images accrued.
Amazingly serendipitous things can happen when I make the effort to make things by my own self!


Very cool!
LikeLiked by 1 person
thank you Richard! glad you liked them 🙂 they’re pretty fun!
LikeLiked by 1 person
Looks like fun!
LikeLiked by 1 person
very interesting and beautiful. I’ve wondered about the gelli-print plates people talk about. So you just wash it off and can reuse it over and over?
LikeLiked by 2 people
hi Jodi thank you! yes, just rinse when you’re done for the day. I wrapped mine in glad wrap, then stored it in a plastic sealed airtight container to protect it. If, it gets torn, no worries. just reheat it in micro till liquid. Pour into the mold. Let it set and take it out of the mold and reuse again. The glycerin is a preservative.
LikeLiked by 1 person
Hi Debi- thanks for in depth DYI gel plate project. I like the depth and texture of your results. I have the same question as Jodi.
LikeLiked by 1 person
Thanks Sharon! have a quick look at my reply to Jodi… plus I’m adding a couple bits and pieces into the text of the article as well. thanks!! Debi
LikeLiked by 1 person
Thanks Debi, I will check it out.
LikeLiked by 1 person
Bangin’ on Love button
LikeLiked by 1 person
hey David, so glad you enjoy this post topic!! wasn’t sure how it would pan out……. now I know 🙂
LikeLike
Love these, Debi!!! Wow, you are really good at this. I’ve been wanting to try it. My understanding is you can rinse and reuse….I hope.
LikeLiked by 1 person
wow, this is great! this was my first experiment with it, but I’ll do more. it is easy. so fun. yes… rinse and and go. if it tears…. reheat in micro & repour into the mold. no worries! the real gelliplates will not do THAT!! lol
LikeLiked by 1 person
Awesome!!
LikeLiked by 1 person
ABSOLUTELY FABULOUS tutorial!!! I love & appreciate how you gave a recipe, opinion & examples. You’ve described everything so easy and your prints are stunning!!….. You definitely make me want to try this 🙂
LikeLiked by 1 person
big smile here 🙂 thank you very much!! and it is easy !
LikeLiked by 1 person
Great tutorial Debi! Enjoyed this and results very much ~
LikeLiked by 1 person
Mary, very glad you liked this! thank you for your feedback too; it really helps when I get comments to know what people are liking/not liking so much. thanks! 🙂
LikeLike
Wonderful Debi; creative serendipity and the joy of experimentation resulting in glorious abstractions. You’re amazing 🙂
LikeLiked by 1 person
smiling over here 🙂 thanks Andrew, it started because these ‘GelliPlates’ in Australia have been priced at $80 – $150+ I thought that was a bit too high, for something I was sure I could make!
LikeLiked by 1 person
Wow….I have to come back and read and study this bit by bit…..so much to absorb and to do! I love what you created with this technique that is so spanking fresh new to me…..so fun!
LikeLiked by 1 person
thank you, glad you like!!! cheers, your river friend 🙂
LikeLiked by 1 person